Wednesday, March 31, 2010

ITALIAN CREPES

Many of my nutrition pals would be horrified at this meal, mostly because it is white flour and cheese. I would have to agree that this is not the most nutritionally sound meal, but sometimes food has to be fun and delicious and the hell with being nutritionally perfect.

Last night, I made Italian crepes for me and the husband. It was a recipe we learned in Rome and beside being delicious, it is reminiscent of one of our favorite trips. Served with a side of broccoli sautéed with garlic, red pepper flakes and flax seeds, it was delicious!

If you haven't made crepes before, you really need a crepe pan and you might want to check out a video on you tube to get the technique down.

Crepes
1 cup flour
2 eggs
1 cup milk
2 tablespoons butter, melted
1 tablespoons fresh mint, chopped

Stir the two eggs into the flour and add a couple of tablespoons of the milk, stir until well combined, then add the rest of the milk and whisk until smooth. Add the melted butter and mint and set aside for at least 30 minutes.

I transfer the crepe batter into a pitcher making it a lot easier to pour. Heat your crepe pan over medium-low heat. Quickly pour enough of the batter into the pan to lightly coat the bottom. You have to pour quickly while swirling the pan making sure the batter coats the pan before setting. It takes a little practice, but once you get the hang of it, you are set.

The crepes cook quickly because they are so thin. Once the batter is set, flip and cook on the other side for a minute or two. If the crepe is very brown, lower the heat slightly. Remove the cooked crepes to a plate and set aside.

(I put a tablespoon of grated pecorino cheese on the crepe, toward one end and then roll it up. You could substitute parmesan if you prefer. Place all of the rolled crepes into a roasting pan, top with homemade tomato sauce and bake in a 350 degree oven until heated through. Make sure to serve this with a delicious Italian red wine.)

Sunday, March 28, 2010

HOMEGROWN LA


I am not one of those people who was blessed with a green thumb. In fact, quite the opposite. I have such a hard time not killing plants. Now, admittedly, the driveway of my apartment, is not the best garden spot, but it's all I have right now, so I have been trying to make due.

So, despite not being born with a green thumb, I am determined to get one. My first step was to take a class (or two). Yesterday, I spent the morning with Marta Teegan of Homegrown LA learning about container gardening and then about growing tomatoes. On a rooftop in downtown LA, Marta has an amazing garden overlooking the city. She has lettuces, artichokes, chard, dandelion greens and tomatoes just to name a few of her crops. The class was two hours with the first part Marta talking about gardening basics-something I desperately needed. She explained about soil, watering, sun and different types of vegetables that we might be able to grow. Then we moved into the garden where she supplied the soil and the plants and we planted our own salad garden! I was so excited, I came home found a great spot for my garden and plotted my future planting endeavors.

I truly was surprised at how much I learned in two hours. Marta has such a laid back demeanor, she clearly presented the material in a way that made sense but wasn't overwhelming and she sent us on our way with handouts in case we forgot the lessons she taught. I am so excited to start planting on my days off this week and look forward to harvesting my own vegetables! More photos to come as the garden grows.

I would like to point out that the third picture from the top is my little salad garden. Can't wait to eat it!

Friday, March 26, 2010

Sautéed Chicken and Spring Vegetables


On Thursdays, the husband plays basketball with his mates. He gets home shortly after 8 and I get home around 6. That means I have two uninterrupted hours, give or take. Sometimes, I will use the time to make an elaborate, labor intensive dinner. Other times I will slack off watching things from the dvr, catching up on some reading or laundry. Last night it was the latter, but it wasn't the laundry or the reading, it was mindless tv. Ugh. So unproductive.

By the time I got off the couch, it was just before 8, yet I managed to whip dinner up in 25 minutes. Take that Rachel Ray, I don't even need your 30 minutes! We had a variation of a chicken picatta with capers and parsley and a spring vegetable sauté that included asparagus, chanterelle mushrooms, peas and baby artichokes.

Wednesday, March 24, 2010

NO DINNER TONIGHT


You've got to give a girl a rest! Tonight we are going out so instead, I am posting a few pics from the produce I picked up this morning at the farmers market.

Tuesday, March 23, 2010

GRILLED LAMB KOFTA KEBABS


I love Jamie Oliver! This is from his "Jamie at Home" book and it is so good that I am making it again on Friday. It' really pretty easy too. I got some great spring lamb shoulder, minced it, mixed in some Middle Eastern spices then broiled it. Top it with some plain yogurt, marinated onions and mixed greens and serve on flatbread. Yum.

You're in luck! I found the recipe online, here it is:

  • 500g trimmed shoulder or neck fillet of lamb, chopped into 2.5cm chunks
  • 2 heaped tbsp fresh thyme leaves
  • 1 level tbsp ground chilli
  • 1 level tbsp ground cumin
  • 4 level tbsp sumac, if you can find any, or finely grated zest of 1 lemon
  • Sea salt and freshly ground black pepper
  • A good handful of shelled pistachio nuts
  • A few handfuls of mixed salad leaves, such as romaine, endive and rocket, washed, spun dry and shredded
  • A small bunch of fresh mint, leaves picked
  • 1 red onion, peeled and very finely sliced
  • 1 lemon
  • A bunch of fresh flat-leaf parsley, leaves picked
  • Extra virgin olive oil
  • 4 large flatbreads or tortilla wraps
  • 4 heaped tablespoons natural yoghurt

1. This dish is best cooked on a barbecue over hot coals, but if that’s not possible, put your grill on to its highest setting or heat up a griddle pan. Either way, get your cooking source preheated.

2. Place the lamb in a food processor with most of the thyme, chilli, cumin and sumac (reserving a little of each for sprinkling over later), a little salt and pepper and all the pistachios. Put the lid on and keep pulsing until the mixture looks like mince.

3. Divide the meat into four equal pieces and get yourself four skewers. With damp hands, push and shape the meat around and along each skewer. Press little indents in the meat with your fingers as you go - this will give it a better texture when cooked.

4. In one bowl, mix the salad leaves and mint. In another, combine the sliced onion with a good pinch of salt and pepper and a squeeze of lemon juice (the acidity will take the edge off and lightly pickle the raw onion). Scrunch this all together with your hands, then mix in the parsley leaves.

5. Grill the kebabs until nicely golden on all sides.

6. Dress your salad leaves and mint with a splash of extra virgin olive oil, a squeeze of lemon juice and some salt and pepper.

7. Meanwhile, warm your flatbreads for 30 seconds on your griddle pan or under the grill, then divide between plates and top each with some dressed salad leaves and onion.

8. When your kebabs are cooked, slip them off their skewers on to the flatbreads - you can leave them whole or break them up as I’ve done here. Sprinkle with the rest of the sumac, cumin, chilli and fresh thyme, and a little salt and pepper.

9. Now either toss the salads, grilled meat and juices together on top of the flatbreads and drizzle with some of the yoghurt before rolling up and serving; or let your friends toss theirs together at the table, then dress and roll up their own, drizzled with some extra virgin olive oil.


Jamie At Home Book
Recipe taken from Jamie At Home by Jamie Oliver
©Jamie Oliver 200[8]. All rights reserved
Photography © David Loftus. All rights reserved

Monday, March 22, 2010

COCONUT RED LENTIL SOUP


Tomorrow, I am cooking for one of my clients and I have decided to make the same dish, lamb kebabs, for us, but that still left me with nothing for tonight. After consulting with one of my favorite websites, http://www.101cookbooks.com, I decided to give this version of lentil soup a try. I love lentil soup, but this is much better than the can of Progresso that I ate as a kid. I have a similar recipe of my own, but tonight I veered off course a little.

I knew that I had lentils of every variety in my cupboard, so this was a perfect recipe. If you do not have lentils in your cupboard, you should go and get some. They are the perfect staple because they cook quickly, are really versatile and their most delightful feature is that they're cheap. Another thing about the good ol' lentil is that they are full of great nutrients, B vitamins, minerals and fiber. I promise you, you are not getting enough fiber. So stock up on lentils and start cooking!

Oh wait, just a few more things, speaking of nutrients. Ginger and the spices that go into curry powder are anti-inflammatory as well as anti-carcinogens. Coconut milk is an ingredient that I am in love with. Stay away from the low fat version, the fat is the most important part. It is also anti-inflammatory and a great source of energy.

COCONUT RED LENTIL SOUP
Heidi Swanson

1 cup / 7 oz / 200g yellow split peas
1 cup 7 oz / 200g red split lentils (masoor dal)
7 cups / 1.6 liters water
1 medium carrot, cut into 1/2-inch dice
2 tablespoons fresh peeled and minced ginger
2 tablespoons curry powder
2 tablespoons butter or ghee
8 green onions (scallions), thinly sliced
1/3 cup / 1.5 oz / 45g golden raisins
1/3 / 80 ml cup tomato paste
1 14-ounce can coconut milk
2 teaspoons fine grain sea salt
one small handful cilantro, chopped

cooked brown rice or farro, for serving (optional)

Give the split peas and lentils a good rinse - until they no longer put off murky water. Place them in an extra-large soup pot, cover with the water, and bring to a boil. Reduce heat to a simmer and add the carrot and 1/4 of the ginger. Cover and simmer for about 30 minutes, or until the split peas are soft.

In the meantime, in a small dry skillet or saucepan over low heat, toast the curry powder until it is quite fragrant. Be careful though, you don't want to burn the curry powder, just toast it. Set aside. Place the butter in a pan over medium heat, add half of the green onions, the remaining ginger, and raisins. Saute for two minutes stirring constantly, then add the tomato paste and saute for another minute or two more.

Add the toasted curry powder to the tomato paste mixture, mix well, and then add this to the simmering soup along with the coconut milk and salt. Simmer, uncovered, for 20 minutes or so. The texture should thicken up, but you can play around with the consistency if you like by adding more water, a bit at a time, if you like. Or simmer longer for a thicker consistency. The thicker this soup got, the more I liked it.

Serves 6.

Sunday, March 21, 2010


CHIPOTLE CHICKEN TACOS

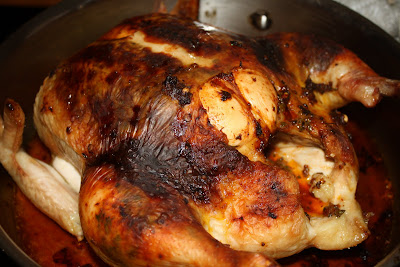
We had already planned on making tacos tonight. It would allow Andrew to show off his amazing tortilla making skills. So I was pretty excited when I got my new Bon Apetit yesterday and there was a recipe for chipotle chicken tacos right on the cover! There's always a jar of pureed chipotles in my fridge. The combination of spicy and smokey is my favorite.

I always have these great aspirations to cook a large portion of the recipes in my magazines each month, but I never do. So at least this recipe will be a step in the right direction.
  • 1/4 cup (1/2 stick) butter, softened
  • 1 tablespoon chopped fresh cilantro leaves plus 3 fresh cilantro sprigs
  • 1 tablespoon chopped fresh oregano leaves plus 3 fresh oregano sprigs
  • 1 tablespoon chopped fresh rosemary leaves plus 3 fresh rosemary sprigs
  • 4 teaspoons minced canned chipotle chiles in adobo*
  • 1/2 teaspoon coriander seeds, crushed in resealable plastic bag with mallet
  • 1 5 1/2- to 6-pound roasting chicken, rinsed, patted dry; neck, heart, and gizzard reserved
  • 2 large onions, each cut into 8 wedges through root end, leaving root ends intact
  • 12 garlic cloves, peeled
  • 1 cup (or more) low-salt chicken broth
  • 1/4 cup dry white wine
  • 8 warm corn tortillas
  • 1 avocado, halved, pitted, peeled, thinly sliced

Using fork, mix butter, all chopped herbs, chipotle chiles, and crushed coriander in small bowl. Season to taste with salt and pepper. DO AHEAD: Can be made 1 day ahead. Cover and chill. Bring to room temperature before using.

Position rack in bottom third of oven and preheat to 400°F. Place chicken, breast side up, in large roasting pan; place reserved neck, heart, and gizzard alongside. Starting at neck end of chicken, slide fingers under skin to loosen, being careful to avoid tearing. Spread all but 1 tablespoon seasoned butter over breast meat and thigh meat under skin.Rub any butter remaining on fingers over outside of chicken. Sprinkle main cavity of chicken with salt and pepper; place all herb sprigs in cavity. Tie legs together loosely.

Place onion wedges in large bowl. Melt remaining 1 tablespoon seasoned butter in small saucepan over low heat; pour over onion wedges and toss to coat. Arrange onions around chicken. Sprinkle onions and chicken with salt and pepper.

Roast chicken and onions 30 minutes. Scatter garlic cloves around chicken; add 1/4 cup broth to roasting pan. Continue to roast chicken until instant-read thermometer inserted into thickest part of thigh registers 170°F, basting occasionally with pan juices and adding more broth by 1/4 cupfuls as needed to maintain juices in roasting pan, about 1 hour 15 minutes.

Remove roasting pan from oven. Tilt chicken, draining juices from cavity into pan. Transfer chicken, onions, and garlic to platter. Tent with foil to keep warm. Add 1/4 cup broth and wine to pan. Place over 2 burners and bring juices to boil, scraping up browned bits. Strain juices into bowl. Discard fat from top of juices.

Cut meat from chicken (reserve 1 1/3 cups for tostadas). Serve, making tacos with warm tortillas, chicken, onions, garlic, and avocado. Drizzle tacos with pan juices

Saturday, March 20, 2010

Jess and Robin make a Spring Feast

Last night Robin was in town so we made dinner together, of course. Whenever we are together we cook. I picked up some of my favorite springtime vegetables-asparagus, fava beans and fresh English peas. Those made up our side dish of a really simple spring vegetable sauté. Robin brought over some crab, my husband rolled out some fresh pasta and in no time we had a feast!

Spring Vegetable Sauté
Serves 4

1/2 pound fresh fava beans, shelled and blanched and shocked*
1/2 pound fresh English peas, shelled and blanched and shocked*
1 bunch asparagus
2 cloves garlic, sliced thinly
1 teaspoon red pepper flakes
1-2 tablespoons mint, chopped
1/4 cup feta, crumbled (optional)
1/4 cup good quality olive oil

In a large sauté pan, heat the olive oil over medium. Add the vegetables and sauté for a minute or two. Then add the garlic and red pepper flakes. Continue to cook until the vegetables are cooked through. Toss in the mint. Remove from heat stir in feta and serve.

*Once you shell the fava beans, there is a thin shell surrounding each bean. To remove it, you want to blanch and shock them. First, drop the favas into boiling water for a minute or two, then shock, but placing them in a pot of ice cold water. When they are cool enough to handle, you can squeeze the favas from the shell.